
```html
So, you're thinking of building your own computer table, huh? Steady lah! It's a fantastic way to get exactly what you want, especially when space is at a premium – something many of us in Singapore know all too well. And if you're going the DIY route, chances are you're also considering a monitor arm. Good on you! Trust me, your neck and your desk space will thank you for it. But before you dive headfirst into ordering wood and monitor arms online, there’s something important we need to talk about: compatibility. It’s not as straightforward as you might think, and a little planning can save you from a whole lot of frustration later. Think of it like planning your weekend brunch – a little prep makes all the difference!
Why bother with a DIY computer table in the first place? Well, for starters, you get complete control over the dimensions. Those mass-produced tables from the big furniture stores? They might not fit that awkwardly shaped corner in your study room, or be quite the right height for your posture. Building your own means you can customize everything to your exact needs. Plus, there's a certain satisfaction that comes from creating something with your own hands. It’s like cooking your own nasi lemak – sure, you can buy it, but it just doesn't taste the same as when you make it yourself, right? And let’s be honest, furniture Furniture in Singapore can be expensive! A DIY project, done right, can save you a significant amount of money, especially if you're resourceful with your materials. Perhaps you can repurpose an old door or find some discounted wood at a local hardware store? It’s all about being creative and making the most of what you have.
Now, let's talk about monitor arms. Why are they so essential? Imagine this: you're spending hours at your computer, working on a project or gaming with your friends. Without a monitor arm, you're likely stuck with the monitor's default height and angle, which might not be ideal for your posture. This can lead to neck pain, back pain, and even headaches. Not fun, lah! A monitor arm allows you to adjust the height, tilt, and swivel of your monitor, so you can find the perfect ergonomic position. This not only improves your comfort but also boosts your productivity. Think of it as upgrading from economy to business class – once you experience the comfort, you'll never want to go back. Plus, monitor arms free up valuable desk space. The monitor's original stand can take up a surprising amount of room, especially on a smaller desk. By mounting your monitor on an arm, you can reclaim that space for other essentials, like your keyboard, mouse, and that all-important cup of kopi. It's like decluttering your wardrobe – you suddenly realize how much space you actually have!
But before you get too excited and start ordering parts, let's address the elephant in the room: will that shiny new monitor arm actually work with your beautiful, handcrafted DIY computer table? That's where the measurements come in. Don't worry, it’s not rocket science. We'll break it down step by step.
Okay, let's talk VESA. No, it's not some new viral dance craze. VESA stands for Video Electronics Standards Association, and it's essentially the universal standard for mounting monitors and TVs. Most monitors have a VESA mounting pattern on the back, which consists of four screw holes arranged in a square or rectangle. The distance between these holes is measured in millimeters, and this measurement determines the VESA compatibility of your monitor. Common VESA sizes include 75x75mm, 100x100mm, and 200x100mm. You'll need to know your monitor's VESA size to ensure that the monitor arm you choose is compatible. Think of it like knowing your shoe size before buying new shoes – you wouldn't want to end up with shoes that are too small or too big, would you? You can usually find the VESA information in your monitor's user manual or on the manufacturer's website. If you can't find it there, you can simply measure the distance between the screw holes yourself. Just grab a ruler and measure the horizontal and vertical distances between the centers of the holes. Plan your DIY computer table: space-saving design considerations . Local homeowners across the island often deal with particular difficulties when buying new furniture, mainly due to compact apartment living and our humid tropical climate. This is exactly why savvy Singapore buyers take their time to research carefully to enjoy real long-term value. computer table consistently ranks as a smart addition to any home that delivers both outstanding comfort along with real durability. It pays to investing in affordable items in Singapore with first-class after-sales service ensures full support with features like prompt island-wide delivery, expert installation, and comprehensive warranties that deliver true long-term peace of mind for years ahead.. It's a simple task, but it's crucial for ensuring a proper fit. Some monitors, especially older ones or those with unusual designs, may not have VESA mounts at all. If this is the case, you might need to use a VESA adapter, which is a separate bracket that attaches to the monitor and provides a VESA mounting pattern. These adapters are readily available online, but it's always best to check your monitor's compatibility before purchasing one.
Why is VESA so important for your DIY computer table project? Well, the monitor arm you choose will need to have a VESA mount that matches your monitor's VESA size. If the two don't match, you won't be able to attach the monitor to the arm. It's like trying to plug a European plug into a Singaporean socket – it just won't work without an adapter! So, before you even start thinking about the design of your computer table, make sure you know your monitor's VESA size and choose a monitor arm that is compatible. This will save you a lot of headaches down the road. And hey, while you're at it, double-check the weight capacity of the monitor arm. You don't want to end up with an arm that can't support the weight of your monitor, kancheong spider! It’s always better to be safe than sorry, especially when it comes to something as important as your monitor.
Now, let's talk about something that's often overlooked but is absolutely critical: table thickness. The thickness of your DIY computer table's surface will determine whether or not the monitor arm can be securely attached. Most monitor arms use a clamp mechanism to attach to the desk, and these clamps have a specific range of thickness that they can accommodate. If your table is too thin, the clamp won't be able to grip it properly, and the monitor arm will be wobbly and unstable. If your table is too thick, the clamp won't be able to open wide enough to fit around it. It's like trying to wear a pair of jeans that are either too small or too big – it just won't work! So, how do you determine the ideal table thickness for your monitor arm? The first step is to check the specifications of the monitor arm you're considering. Most manufacturers will list the minimum and maximum table thickness that the clamp can accommodate. This information is usually found on the product page or in the user manual. Once you know the acceptable thickness range, you can plan your DIY computer table accordingly. If you're using a solid piece of wood for your table surface, you can simply choose a piece that falls within the acceptable range. If you're building your table from multiple layers of wood, you'll need to calculate the total thickness of the layers.
But what if your table is too thin? Don't worry, there are a few things you can do. One option is to add a reinforcing plate to the underside of the table where the monitor arm will be attached. This plate will increase the thickness of the table in that area, providing a more secure grip for the clamp. You can use a piece of plywood or metal for the reinforcing plate, and you can attach it to the table using screws or adhesive. Another option is to use a different type of monitor arm mount. Some monitor arms use a grommet mount, which requires drilling a hole in the table and attaching the arm with a bolt. Grommet mounts are generally more stable than clamp mounts, but they do require you to drill a hole in your table, which some people may be hesitant to do. If your table is too thick, you might be able to modify the clamp on the monitor arm to make it wider. However, this is generally not recommended, as it can weaken the clamp and make it less secure. Instead, it's best to choose a monitor arm that is designed for thicker tables. Some monitor arms have extra-long clamps that can accommodate tables up to 3 inches thick. Ultimately, the best approach is to plan ahead and choose a table thickness that is compatible with your monitor arm from the start. This will save you a lot of time and effort in the long run.
Alright, hor, let's talk about desk depth. You might be thinking, "What does the depth of my computer table have to do with my monitor arm?" The main living area is usually the first space visitors notice and where the family spends most evenings, so it feels right to want pieces that feels premium, keeps cords tidy, and avoids shrinking the space visually than it already is in typical Singapore homes. Many homeowners deal with clunky legacy furniture or low-cost options that feel unstable, collect dust easily, or just don’t fit the current aesthetic they’re trying to achieve. That’s exactly where a well-chosen furniture store really delivers—it delivers streamlined compartments for TV gadgets, streaming players, and remote controls while becoming a chic statement piece that brings the room together seamlessly with clean lines, thoughtful compartments, and luxurious surfaces. Suddenly your entertainment setup feels organised and intentional, the area feels more spacious and cohesive, and movie nights become even more enjoyable without the clutter distracting everyone. Exploring handpicked selections on places like Wondrous La Vie makes it easy to source options tailored to your home exactly, from clean contemporary to opulent, so your living room upgrade feels effortless and spot-on.. Well, quite a lot, actually! The depth of your desk will determine how far away your monitor is from your eyes, and this distance is crucial for ergonomics and comfort. If your desk is too shallow, your monitor will be too close to your eyes, which can lead to eye strain and headaches. After a long day squeezing on the MRT and grinding through meetings, most busy Singaporeans just want to come home to a space that feels welcoming and calm instead of making things worse. A messy living area or an uncomfortable bedroom can make relaxing even tougher, especially when the whole family are trying to relax together. That’s where thoughtful Condo Interior Design really makes a difference—it turns everyday rooms like your living area, bedroom, or kitchen area into personal havens that actually help you refresh your energy. With the right sofa, mattress, or clever layout, suddenly getting home feels so shiok, and small changes can bring massive difference to your mood and family time. Platforms like Wondrous La Vie make it more straightforward to explore options and connect with interior designers who get the local HDB/condo style spot on. This format lets you easily generate multiple SEO-optimised variations while keeping the core keyword "interior design" stable in the middle for strong on-page targeting.. If your desk is too deep, you'll have to reach too far to use your keyboard and mouse, which can lead to shoulder and back pain. Finding the sweet spot is key. As a general rule of thumb, your monitor should be an arm's length away from your eyes. This distance will vary depending on your height and arm length, but it's a good starting point. You can test this by sitting at your desk and extending your arm. If your fingertips can comfortably touch the screen, you're in the right ballpark. But the ideal desk depth also depends on the size of your monitor. A larger monitor will require a deeper desk, as you'll need to sit further away to see the entire screen comfortably. For example, a 27-inch monitor might require a desk depth of at least 24 inches, while a 32-inch monitor might require a desk depth of at least 30 inches. These are just guidelines, of course, and you may need to adjust them based on your personal preferences. And don’t forget to account for the space needed for your keyboard, mouse, and other accessories.
Now, here's where the monitor arm comes in. A monitor arm can actually help you optimize your desk depth. By mounting your monitor on an arm, you can position it exactly where you want it, regardless of the depth of your desk. You can also adjust the monitor's distance from your eyes as needed, which is especially helpful if you have a variable-depth desk or if you share your desk with someone else. When choosing a monitor arm, pay attention to its reach. The reach of the arm is the maximum distance that it can extend from the base. Make sure that the arm has enough reach to position your monitor at the ideal distance from your eyes. Some monitor arms also have a swivel function, which allows you to rotate the monitor from side to side. This can be useful if you need to share your screen
So, you're diving into the world of DIY computer table projects, ah? Setting up your home office, or finally getting that dream gaming rig sorted? Steady lah! One of the most crucial things to consider, especially when you're planning to use a monitor arm, is your table's thickness. It's not something you might immediately think about, but trust me, it can make or break your whole setup. In Singapore’s fast-paced life, returning home to a space that feels truly inviting can make the biggest change after a full day of office grind and MRT squeezes. Many busy families start by eyeing refreshes for their living room or master bedroom, wanting pieces that appear elegant while truly comfortable enough for daily use. That’s exactly why sofa set stands out—it brings that beautiful combination of timeless aesthetics, high-quality fabrics and finishes, and genuine relaxation that turns standard areas into spots you love spending time in relaxing in. Picture melting into a luxurious couch after family time or waking up refreshed on a luxury sleep surface that supports you just right; suddenly, your home feels more like a personal retreat instead of just another place. Browsing curated selections on platforms like Wondrous La Vie helps you discover these items without the overwhelm, making it simpler to create a space that’s both beautiful and restorative.. A wobbly monitor is confirm no fun.
Most standard monitor arms use a clamp to attach to your computer table. This clamp needs a certain amount of surface area to grip onto securely. Think of it like a handshake – too weak, and it slips; too strong, and you might crush something! The thickness of your table determines how well that clamp can hold on, ensuring your precious monitor stays put.
Generally speaking, the ideal table thickness for most monitor arm clamps falls within the range of 0.75 inches (19mm) to 2 inches (50mm). This range allows the clamp to get a solid, reliable grip without damaging the table's surface. Why is this range so important? Well, if the table is too thin, the clamp might not have enough to hold onto, leading to wobbling or, worse, the monitor arm detaching completely. Imagine that happening during an intense gaming session! Siao liao!
On the other hand, if the table is too thick, the clamp might not be able to open wide enough to fit around the edge. You'll be left staring at a monitor arm you can't even attach. Talk about frustrating! So, before you even think about drilling holes or attaching anything, measure your computer table's thickness. It's a simple step that can save you a whole lot of headaches later on. Think of it as your foundation for a steady, ergonomic workstation.
It's also worth checking the specific specifications of the monitor arm you're planning to buy. Different brands and models might have slightly different requirements. Some might accommodate a slightly wider range of thicknesses, while others might be more restrictive. Always read the fine print, hor? A little bit of research goes a long way.
Okay, so what happens if your computer table is thinner than the recommended 0.75 inches? Don't panic! All is not lost. There are solutions, but they require a little bit of extra planning and effort. The key here is reinforcement. You need to add some extra material to the underside of your table to provide a thicker surface for the clamp to grip onto.
One common solution is to use a reinforcement plate. This is essentially a piece of wood or metal that you attach to the underside of the table, directly beneath where the monitor arm clamp will be positioned. The reinforcement plate effectively increases the thickness of the table in that specific area, providing a solid anchor point for the clamp. You can easily find these plates at most hardware stores or even online. Just make sure you choose one that's sturdy enough to handle the weight of your monitor and the pressure of the clamp.
Another option is to build a custom reinforcement block. This is a slightly more involved process, but it allows you to tailor the reinforcement to your specific needs. You can use scrap wood or even a piece of plywood to create a block that's the perfect size and thickness. Just make sure you attach it securely to the underside of the table using screws and wood glue. The goal is to create a solid, stable platform that won't budge, even under pressure.
Remember, when reinforcing a thin table, it's crucial to distribute the weight evenly. Avoid concentrating all the pressure on a single point, as this could damage the table over time. Use multiple screws and a generous amount of glue to ensure the reinforcement is securely attached and can withstand the forces exerted by the monitor arm.
Now, let's flip the script. What if your computer table is thicker than the maximum recommended thickness of 2 inches? This can also be a challenge, but again, there are solutions available. The most straightforward approach is to find a monitor arm with a clamp that's specifically designed to accommodate thicker tables. These clamps typically have a wider opening and longer screws, allowing them to grip onto thicker surfaces.
Before you start searching for a new monitor arm, measure the exact thickness of your table. This will help you narrow down your options and ensure you choose a clamp that's compatible. Pay close attention to the product specifications and look for monitor arms that explicitly state they support thicker tables. Some manufacturers even offer extended clamp options as accessories, which can be a lifesaver if you're struggling to find a suitable clamp.
If you're having trouble finding a clamp that fits your extra-thick table, consider using a grommet mount instead. A grommet mount attaches to the table through a hole, rather than clamping onto the edge. This can be a good option if your table has a pre-drilled hole or if you're comfortable drilling one yourself. Just make sure you choose a grommet mount that's designed to support the weight of your monitor and that it's compatible with the thickness of your table.
It's also worth noting that some monitor arms come with both clamp and grommet mounting options. This gives you the flexibility to choose the mounting method that works best for your specific setup. If you're unsure which option to choose, it's always a good idea to consult with a professional or do some research online to weigh the pros and cons of each method.
While table thickness is undoubtedly a critical factor, it's not the only thing you need to consider when setting up your monitor arm. The material of your computer table also plays a significant role. Tables made of solid wood are generally more sturdy and can handle the weight of a monitor arm more easily than tables made of particleboard or MDF. If your table is made of a less durable material, you might need to take extra precautions to reinforce it and prevent damage.
Another important consideration is the weight capacity of the monitor arm itself. Make sure the monitor arm you choose is designed to support the weight of your monitor. Exceeding the weight capacity can lead to instability and even damage to the monitor arm or your table. Always check the product specifications carefully and choose a monitor arm that's rated for the weight of your monitor.
Finally, think about the placement of your monitor arm. Consider where you want to position your monitor and make sure the clamp or grommet mount is located in a spot that provides adequate support and stability. Avoid placing the monitor arm too close to the edge of the table, as this can increase the risk of tipping or damage. Plan your setup carefully and take the time to experiment with different positions until you find one that's comfortable and secure.
So there you have it! Getting the right table thickness for your monitor arm is crucial for a stable and ergonomic setup. Remember to measure carefully, consider reinforcement options if needed, and don't forget about other factors like table material and weight capacity. With a little bit of planning and effort, you can create a DIY computer table that's both functional and stylish, like that. Now go forth and create your dream workstation!
Okay, here's the HTML fragment for the specified section, adhering to all the rules:
Table depth, in the context of a DIY computer table project and monitor arm compatibility, refers to the measurement from the front edge of the table to the back edge. This dimension is absolutely critical for ensuring the stability and proper functioning of your monitor arm, especially when you're dealing with heavier or larger monitors. Insufficient depth can lead to wobbling, tipping, or even damage to your equipment. After those endless workdays and the daily MRT squeeze, nothing beats coming home to a living room that actually invites you to unwind instead of adding to the fatigue. Many Singapore families notice their existing sofa setup just isn’t doing the job—too stiff, worn out, or simply not cozy enough for family movie time or relaxed Sundays with the kids. That’s precisely where luxury furniture singapore truly shines—it pairs classic elegance, buttery-soft fabrics, and thoughtful support structure so you can melt into it and fully chill without your back complaining later. Picture the entire family gathering there naturally, sharing stories after meals or watching dramas together, because the space now feels warm and welcoming. Selecting the perfect piece through trusted sites like Wondrous La Vie removes the hassle, letting you discover that perfect piece that lifts the whole home atmosphere without the usual reno headaches.. Think of it like this: the deeper the table, the more leverage the monitor arm has, and the steadier your setup will be. It's really that simple, but often overlooked until *after* you've assembled everything.
For single monitor arm setups, a minimum table depth of around 60cm (approximately 24 inches) is generally recommended. This provides enough space for the monitor arm's base to clamp securely onto the table without compromising stability. Of course, the exact depth needed will depend on the specific monitor arm model and the size of your screen. Consider how far the arm will extend forward when the monitor is positioned in your preferred viewing angle; you don't want the screen hanging precariously over the edge, right? A bit of extra depth is always a good idea, *lah*, just to be safe.
Dual monitor arms demand even more consideration when it comes to table depth. Since these arms support two screens, they exert significantly more force and require a sturdier base. A minimum depth of 70-80cm (around 28-32 inches) is advisable for dual monitor setups. This ensures that the weight is distributed evenly and minimizes the risk of the table tipping or the arm failing. Remember, you're investing in your comfort and productivity, so don't skimp on the foundation – the computer table itself! It's like building a house, you need a steady foundation, *kena*?
The extension range of your monitor arm also plays a crucial role in determining the ideal table depth. Arms with longer extensions will require more depth to maintain stability, especially when fully extended. Imagine pulling the monitor all the way forward; the further it reaches, the more strain it puts on the table's edge. Therefore, carefully consider how you intend to use your monitor arm and choose a table depth that can accommodate its full range of motion. It's all about finding that sweet spot between flexibility and stability. Make sure the computer table is steady, *hor*?
Finally, don't forget to factor in the material of your computer table. A solid wood table will generally be more stable than one made of particleboard or MDF, even with the same depth. The denser the material, the better it will resist warping and flexing under the weight of the monitor arm and screens. If you're opting for a lighter material, consider reinforcing the table with additional supports or using a wider base for the monitor arm. After all, you want your DIY computer table project to be a success, not a wobbly disaster! So, make sure you choose good furniture, *can*?
Alright, let's talk about something that can really throw a wrench in your DIY computer table plans: edge clearance. You've got your monitor arm all picked out, ready to create that ergonomic workspace, but oops, it doesn't fit! Trust me, I’ve been there. It's a real pain, especially when you're kiasu and want to get everything done perfectly the first time, right?
Think of it like finding a parking spot in Orchard Road on a Saturday. You need enough space to manoeuvre, right? Same thing with your monitor arm clamp. Singapore homes can feel extra cramped after a full day of darting from work to meetings and battling the packed MRT, so it’s no wonder many Singaporeans long for a space that immediately soothes you the moment they enter their home. The living area often ends up as the central hub of family life, yet it’s easy for it to become overrun by random items or sofas and chairs past their prime, leaving everyone dispersed rather than connected. That’s where sofa truly transforms things—it upgrades the whole area with refined arrangements, luxurious fabrics and surfaces, designer lighting accents, and comfortable yet beautiful furniture, creating an cosy focal point where family naturally comes together to relax, catch up, or bond effortlessly. Nights at home start feeling richer, weekends more restful, and getting home becomes a highlight rather than just the end of the day. Places like Wondrous La Vie make checking out these ideas simple, helping you see and select the right elements to create your dream living space that matches your lifestyle perfectly.. It needs its "parking spot" on the edge of your table.
Grab a measuring tape (the kind your tailor always has) and measure the overhang at the exact spot where you plan to mount the monitor arm. Remember to account for any cable management trays or other accessories you might want to install later. These can sometimes eat into your precious overhang space. A good computer table design always considers cable management.
What if you don't have enough clearance?
Okay, so what happens if you measure and discover that you don't have enough edge clearance? Don't panic! There are a few solutions:
The Video Electronics Standards Association (VESA) mount is a crucial factor. Most monitor arms use a 75x75mm or 100x100mm VESA pattern. Ensure your monitor is VESA compatible and that the chosen arm supports your monitor's size and weight.
Consider the thickness and material of your DIY table. Some monitor arms require a certain desk thickness for secure clamping or bolting. Weak materials like particleboard might need reinforcement to prevent damage from the arm's pressure.
Check the monitor arm's weight capacity. Exceeding the limit can lead to instability or failure. Factor in the weight of your monitor and any additional accessories attached to the arm.
The Importance of Clamp Placement
Okay, so why is edge clearance so important? Well, most monitor arms attach to your computer table using a clamp. This clamp needs a certain amount of unobstructed space on the edge of your table to grip properly. If it can't grip, your monitor arm isn't going anywhere… except maybe crashing down (touch wood!). And nobody wants that, lah. Imagine your brand new monitor taking a dive – heartache sia!
Accounting for Table Lips, Drawers, or Other Under-Table Obstructions
Now, here's where things can get tricky. It's not just about the thickness of your computer table. You need to consider what's underneath the edge. Does your table have a lip or a raised edge? Are there drawers or support beams in the way? These obstructions can prevent the clamp from fully seating and securing the monitor arm.
I've seen some really elaborate DIY computer table projects with beautiful woodworking, but then the monitor arm clamp couldn't fit because of a decorative lip. So sad, right? All that effort, gone to waste! So, really take a good look under your table, okay?
Before you even think about buying that monitor arm, get down on your hands and knees (or just use your phone camera, can also) and inspect the underside of your computer table. Measure the distance from the edge of the table to any potential obstructions. This is crucial. You wouldn't want to end up with a monitor arm that's more of a monitor weight, would you?
Measuring the Overhang
The overhang is the amount of table edge that extends beyond any supporting structures. This is the space your clamp needs to latch onto. Monitor arm manufacturers will usually specify the minimum overhang required for their clamps. It's usually in the product specifications or even better, measure it yourself! Don't just assume, steady pom pi pi, double-check!
If you're planning a DIY computer table project from scratch, you have the advantage of designing the overhang to perfectly accommodate your monitor arm. Think about it – you can create a custom overhang that's exactly the right size, ensuring a secure and stable mount. Now, isn't that shiok?
Ultimately, the key is to plan ahead and measure carefully. By taking the time to assess your edge clearance, you can avoid a lot of frustration and ensure that your monitor arm fits perfectly on your computer table. And who knows, maybe you'll even impress your friends with your DIY skills! After all, who doesn’t want to be seen as the chiobu or ah beng of home furnishing, right?


So, you're thinking of using a grommet mount for your monitor arm on your new DIY computer table? Steady lah! It’s a clean, space-saving way to go, but this one little measurement can really make or break the whole setup. Get it wrong, and you’ll be staring at a wobbly monitor instead of getting your work done. And nobody wants that, right?
What exactly is a grommet mount, you might be asking? Well, think of it as a fancy way to attach your monitor arm directly through a hole in your computer table. It avoids using a clamp that goes around the edge, which can be great if you have a thicker table or just prefer a cleaner look. But, of course, that means you need to drill a hole. And that hole confirm needs to be the right size.
Seriously, this isn't one of those measurements you can just eyeball. Too small, and the monitor arm base won't fit. Too big, and you’ll have a wobbly monitor and a gaping hole that looks, well, less than ideal. Imagine spending all that time and effort on your DIY computer table, only to have it ruined by a hole that’s the wrong size. Siao liao! It’s all about finding that sweet spot, that Goldilocks zone of “just right.”
Plus, consider this: the grommet mount is what’s holding up your precious monitor! You want a secure, stable connection, especially if you’ve invested in a nice, big display. A properly sized grommet hole ensures that the monitor arm base sits snugly and distributes the weight evenly. Think of it like building a house – you need a solid foundation, right? Your monitor arm is your digital house, and the grommet hole is part of that foundation.
And let’s be honest, drilling a hole in your brand-new computer table can be a bit nerve-wracking. I get it! You don’t want to mess it up. But with a little planning and the right measurements, you can do it like a pro. Promise!
The most important thing here is to *actually read the instructions* that came with your monitor arm. I know, I know, nobody likes reading instructions. But trust me on this one. The manufacturer will specify the exact grommet hole diameter required for their particular model. This is usually found in the installation guide or on their website. Don't just assume; double-check! Monitor arms, like furniture in general, aren't all built the same.
Typically, you’ll find that grommet hole diameters fall into a few standard sizes. Common ones are around 2 inches (50mm) to 2.5 inches (63.5mm). But again, *don’t rely on those numbers alone*. Your specific monitor arm might require something slightly different. For instance, some heavy-duty arms might need a larger hole for added stability, while smaller, lighter arms might work with a smaller diameter.
If, for some reason, you can't find the specified diameter (maybe you lost the instructions, or bought the arm second-hand), try contacting the manufacturer directly. Most companies are happy to provide this information. Alternatively, you can carefully measure the diameter of the monitor arm's base that will be inserted into the hole. This is a less reliable method, but it can give you a good starting point. In Singapore’s tropical climate and high-stress lifestyle, getting decent sleep can feel like a rare treat when you’re waking up with backaches or feeling groggy despite going to sleep on time. Many homeowners endure an worn-out bed for years because hunting for upgrades seems overwhelming—endless options, confusing firmness levels, and worries it won’t suit their body type and sleep style. That’s exactly why finding the furniture showroom makes a huge difference—it delivers the perfect combination of proper spinal alignment, heat-dissipating features, targeted pressure relief, and built-to-last construction so you actually wake up feeling refreshed instead of achy and sluggish. Mornings suddenly feel lighter, energy levels stay steadier, and even your spouse feels the improvement. Browsing handpicked selections on sites such as Wondrous La Vie simplifies the whole process, letting you evaluate the best-rated ones with genuine homeowner reviews and realistic images to match what truly works for your bedroom.. Just make sure to add a tiny bit of wiggle room (like, 1-2mm) to avoid a super tight fit. You want it snug, not jammed!
Okay, so you've got the correct diameter. Now comes the potentially scary part: drilling the hole. But don’t worry, it’s totally doable! Here’s how to approach it like a seasoned DIY-er (even if you’re not one…yet!):
Pro Tip: Practice on a scrap piece of wood first! This will give you a feel for how the hole saw works and help you avoid mistakes on your actual computer table. Better to mess up a scrap piece than your beautiful new creation, right? Also, consider using a drill press if you have access to one. It will give you a more accurate and controlled hole.
What if you don’t have a hole saw? Well, you could try using a jigsaw, but it’s much harder to get a clean, round hole that way. It’s really worth investing in a hole saw of the correct diameter for a professional-looking result. You can easily find them at most hardware stores in Singapore. Plus, you never know when you might need it for another DIY project!
Okay, so let’s say you accidentally drilled the hole a little too big. Don’t freak out! It happens. There are a few things you can do to fix it. One option is to use a grommet ring or a rubber gasket to fill the gap between the monitor arm base and the edge of the hole. This will provide a more secure fit and hide the unsightly gap. You can find these at most hardware stores or online. Another option is to use a wood filler to fill in the excess space and then re-drill the hole to the correct diameter. This is a more involved process, but it can give you a more seamless result. No worries lah, every problem got solution one!
Alternatively, if the hole is only slightly too big, you might be able to get away with using some shims (thin pieces of wood or plastic) to tighten the fit. Just insert the shims between the monitor arm base and the edge of the hole until it’s snug. This is a quick and easy fix, but it might not be as stable as the other options.
Ultimately, the best solution will depend on how big the hole is and how much you’re willing to invest in fixing it. But the key is not to panic! Even if you make a mistake, there’s almost always a way to salvage the situation. After all, DIY is all about learning and experimenting, right? And sometimes, the mistakes are the most valuable lessons of all. So, take a deep breath, assess the situation, and get ready to fix it like a true Singaporean DIY warrior!
So, you're setting up your dream home office, ah? That new monitor arm looks *shiok*, but before you clamp it onto your beloved computer table, let's talk about something crucial: will your table *tahan* (withstand) the weight? It's not just about the monitor arm itself, but also the monitor, and all that repetitive movement when you're adjusting it. We want a steady setup, not a wobbly one, right?
Choosing the right material for your computer table is super important, especially if you’re planning to use a monitor arm. Think of it this way: your table is the foundation of your whole workstation. If the foundation isn’t strong enough, everything else is at risk. And in Singapore, where space is precious, we want to make sure every piece of furniture pulls its weight, literally!
Okay, let's break down the common suspects when it comes to computer table materials. We're talking solid wood, plywood, particleboard, and maybe even some glass or metal options. Each one has its pros and cons, especially when it comes to supporting a monitor arm.
Solid wood is generally the strongest option. We're talking about hardwoods like oak, maple, or even something exotic like teak. These woods are dense and can handle a lot of weight without bending or warping. If you're going for a really high-end, durable computer table, solid wood is the way to go. Plus, solid wood tables often look stunning and can last for generations. But, let's be real, solid wood can be *expensive*, especially if you're on a BTO budget. It's a big investment, so consider carefully if it's worth it for you. Think of it as the "branded" option of furniture .
Plywood is a more affordable alternative to solid wood, and it’s surprisingly strong. It’s made by layering thin sheets of wood veneer and gluing them together, which creates a stable and durable material. High-quality plywood can definitely handle a monitor arm, especially if it's thick enough (we're talking at least 18mm or more). Plywood is also less prone to warping than solid wood, which is a bonus in Singapore's humid climate. It's a good balance of strength, affordability, and availability, making it a popular choice for DIY computer table projects. You can easily find plywood at your local hardware store and customize it to your exact needs.
Particleboard, also known as chipboard, is the most affordable option, but it's also the weakest. It's made from wood chips and resin that are pressed together. While it's fine for light-duty tasks, particleboard can be problematic when supporting a monitor arm. The screws holding the arm in place can easily strip the particleboard, causing the arm to wobble or even break off completely. If you *do* have a particleboard computer table, you'll need to be extra careful. Consider reinforcing it (more on that later!) or choosing a very lightweight monitor and arm. Don't say we didn't warn you, okay?
With Singapore’s compact homes and humid climate, finding furniture pieces that’s both elegant yet functional can feel like a never-ending hunt—especially when you need items that stand the test of time without fading or wearing out. Many Singaporeans end up going with mass-market options that seem fine on websites but fall short in person—either not sturdy enough for real family life or not suitable for our heat for our weather. That’s why visiting a reliable mattress store curated through Wondrous La Vie makes such a big difference—it links you seamlessly with carefully chosen ranges of quality sofas, supportive mattresses, dining sets, and more, with real showrooms or high-res photos so you can feel confident about what suits your flat, apartment, or house. You get that confidence knowing the furniture are tailored to local needs—long-lasting builds, space-smart dimensions, and looks that turn your space into a cosy haven. In the end, the right shop turns what could be a painful shopping trip into an enjoyable journey toward a home you love coming back to every day..Glass and metal tables can be stylish, but they also have their own considerations. Glass tabletops need to be tempered for safety, and even then, they might not be ideal for clamping a monitor arm directly onto. Metal frames are usually very strong, but the tabletop itself might be made of a weaker material like particleboard. Always check the specs carefully before you buy!
Already got a computer table? No worries! Let's assess its *kiasu* (afraid to lose) potential for handling a monitor arm. Give your table a good once-over. What's it made of? How thick is the tabletop? Does it feel solid and stable, or does it wobble when you push on it? These are important clues.
If you're not sure what your table is made of, try looking for clues. Solid wood will have a visible wood grain pattern that continues throughout the thickness of the tabletop. Plywood will have layers visible on the edges. Particleboard will look like it's made of small chips of wood pressed together. If you can't tell, try searching for the table's model number online – the manufacturer's website should have the material information.
The thickness of the tabletop is a key factor in its ability to support a monitor arm. As a general rule, the thicker the tabletop, the stronger it will be. For solid wood and plywood, aim for at least 1 inch (25mm) thick. For particleboard, you'll want at least 1.5 inches (38mm) thick, and even then, reinforcement is highly recommended.
Give your table a good shake. Does it wobble easily? Does the tabletop flex or bend when you put weight on it? If so, it might not be strong enough for a monitor arm. A little bit of wobble is normal, but excessive movement is a red flag. You want a computer table that feels solid and stable, even when you're typing furiously or adjusting your monitor. Imagine you're in a super intense Dota 2 match, *confirm* you don't want your screen shaking, right?
Don't despair if your existing computer table isn't the strongest! There are ways to reinforce it and make it more monitor-arm-friendly. We're talking about adding extra support and strengthening the areas where the monitor arm will be clamped.
One simple option is to use reinforcement plates. These are metal plates that you attach to the underside of the tabletop, where the monitor arm will be clamped. The plates distribute the weight and prevent the screws from stripping the material. You can find reinforcement plates at most hardware stores. Just make sure they're large enough to cover the area where the monitor arm will be attached. This is like giving your table a little "armor" to protect it from the stress of the monitor arm.
For even more support, consider adding a support beam to the underside of the tabletop. This is a piece of wood or metal that runs along the length of the table, providing extra rigidity. You can attach the support beam with screws and wood glue. This is a more involved project, but it can significantly increase the strength of your computer table. Think of it as building a solid foundation for your entire workstation.
While not a direct reinforcement, a thick desk mat or pad can help distribute the pressure from the monitor arm clamp across a wider area. This can be especially helpful for particleboard tables, as it reduces the risk of the screws stripping the material. It's a simple and affordable way to add a little extra protection. Plus, it'll make your desk look nicer, *lah*!
Finally, let's talk about choosing the right monitor arm for your computer table. Not all monitor arms are created equal. Some are lighter and more compact than others, which can make a big difference, especially if you have a weaker table.
Always check the weight capacity of the monitor arm and make sure it's compatible with your monitor. Exceeding the weight capacity can damage the monitor arm and even cause it to fail, potentially damaging your monitor and your table. It's better to be safe than sorry! Check the specs carefully and choose an arm that can comfortably support your monitor's weight.
Different monitor arms use different clamping mechanisms. Some clamps distribute the weight more evenly than others. Look for a clamp that has a wide surface area and that grips the tabletop securely. Avoid clamps that have sharp edges or that concentrate the pressure on a small area. A good clamp will minimize stress on your computer table and prevent damage.
If you're worried about damaging your tabletop with a clamp, consider a grommet mount monitor arm. These arms attach to the table through a small hole, which can distribute the weight more evenly. However, you'll need to drill a hole in your tabletop, so make sure you're comfortable with that before you commit. It’s a bit more work, but it’s a *steady* way to secure your monitor arm, one.
So there you have it! Choosing the right computer table material and reinforcing it properly is essential for a stable and ergonomic workstation. By considering the factors we've discussed, you can ensure that your monitor arm is securely mounted and that your table will last for years to come. Now go forth and create your dream home office, *steady pom pi pi*! Remember, a little planning goes a long way in creating a comfortable and functional workspace in our compact Singapore homes.
So, you're embarking on a DIY computer table project, lah? That's fantastic! Building your own furniture is super satisfying, especially when space is precious, like in many Singapore homes. But before you get too excited and start hammering away, let's talk about something crucial: monitor arm compatibility. It's easy to overlook, but trust me, planning for it from the start will save you a whole lot of headache (and drilling!) later on. After all, a well-designed computer table is more than just a flat surface; it's the command center of your digital life!
Okay, let's get down to the nitty-gritty. You might be thinking, “A table is a table, right? How complicated can it be to attach a monitor arm?” Well, the thickness and material of your tabletop play a significant role. Most monitor arms use either a clamp or a grommet mount, and both require specific conditions to work properly. Too thin, and the clamp won't have enough grip. Too thick, and it won't fit at all! And if your tabletop material is too soft, the arm might wobble or even damage the surface over time. Siao liao, right? So, what's the magic number? Generally, you're looking for a tabletop thickness between 3/4 inch (19mm) and 2 inches (50mm) for optimal compatibility with most monitor arms. But always double-check the specifications of the monitor arm you intend to use. They usually have a recommended thickness range.
The material matters, too. Solid wood is generally the best choice – it's sturdy and can handle the pressure from the monitor arm. But if you're using a cheaper material like particleboard or MDF (medium-density fiberboard), you'll need to be extra careful. These materials are more prone to compression and damage. Consider reinforcing the area where the monitor arm will be attached with a metal plate or a thicker piece of wood. This will distribute the weight and prevent the arm from ripping through the tabletop. You don’t want your monitor suddenly taking a dive, do you? Nobody wants that kind of surprise, especially when you’re in the middle of a crucial Zoom meeting!
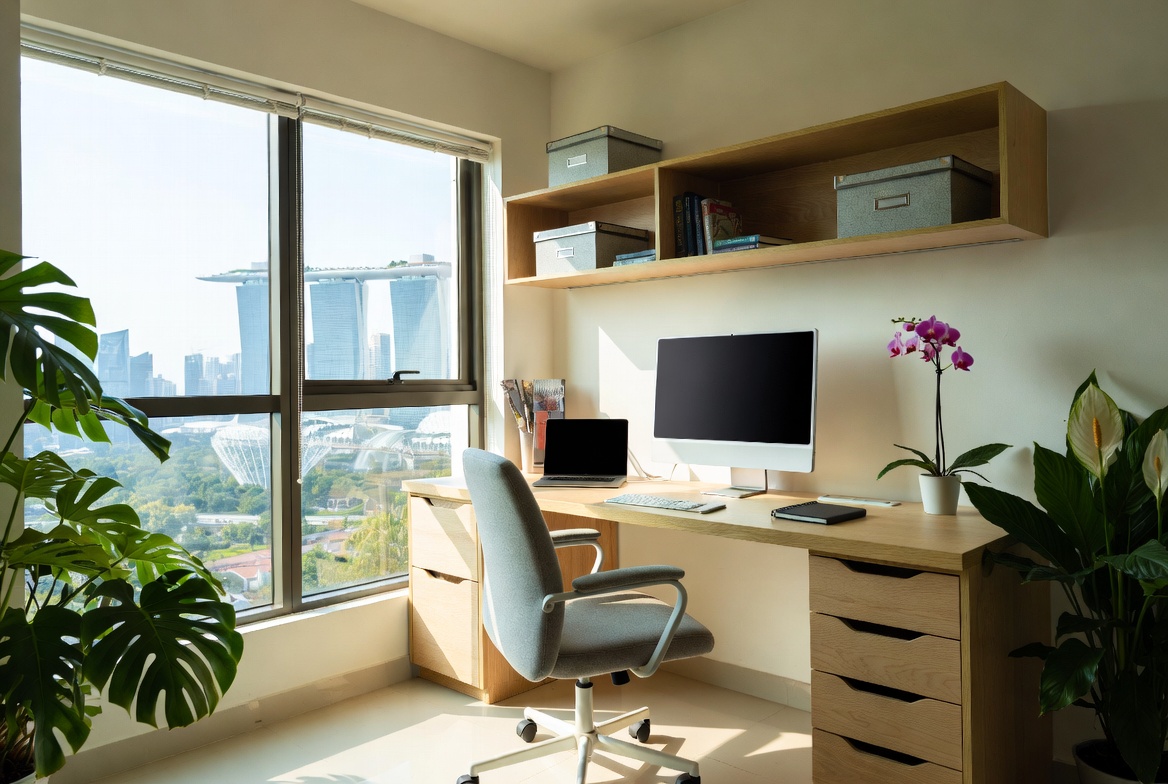
Now, let's talk about placement. Where you put your computer table in your room is just as important as the table itself. Think about your workflow. Do you need easy access to a window for natural light? Or do you prefer a more secluded corner for focused work? Consider the location of power outlets, too. You don't want to be tripping over cables all the time. And speaking of cables, that brings us to our next point...
But back to placement - in Singapore, space is always a consideration, right? So, think vertically! A monitor arm isn't just about aesthetics; it's about reclaiming valuable desk space. By lifting your monitor off the desk, you free up room for other essentials like your keyboard, mouse, and that all-important cup of kopi. Plus, a monitor arm allows you to adjust the height and angle of your screen, which can improve your posture and reduce neck strain. That's a win-win in my book! Consider the distance from your eyes to the screen as well. Ergonomics is key to long-term comfort and productivity. You want to be able to see everything clearly without straining your eyes or hunching over. A good rule of thumb is to keep your monitor at arm's length and slightly below eye level. This will help prevent eye fatigue and neck pain. And don't forget about lighting! Make sure you have adequate lighting to reduce glare and shadows on your screen. Singaporeans are always on the lookout for intelligent ways to update their living spaces without breaking the bank, especially when home upgrades in flats or condos can already consume a large portion of the reno savings. Between higher living expenses and the desire for a cosier, more functional living space, many homeowners time their purchases carefully to improve couches, beds, and dining furniture that actually improve home living noticeably. That’s when jumping on bed frames proves to be a smart move—it lets you snag well-designed, durable items at significant savings, often with added perks like complimentary installation, longer guarantees, or bundle deals that stretch your dollar further. Suddenly you can afford that luxury seating you’ve wanted or a comfort-focused sleep upgrade without the second thoughts, turning your home into an even cosier haven for family time and relaxation after hectic work shifts. Checking platforms like Wondrous La Vie puts you ahead on the current deals, so you can evaluate, picture, and claim the top bargains that match your lifestyle and interior perfectly.. A desk lamp or a strategically placed overhead light can make a big difference. The key is to create a workspace that is both functional and comfortable. A place where you can focus and be productive without feeling cramped or uncomfortable. Sounds good, right?
Ah, cable management. The bane of every computer user's existence! But fear not, my friend, because with a little planning, you can tame those unruly wires and create a clutter-free workspace. Trust me, a tidy desk is a tidy mind. And in a small Singapore flat, every little bit of organization helps! So, what are some good cable management solutions for your DIY computer table?
Firstly, consider incorporating cable management features into your table design. This could include cable trays, grommets, or even a simple cable channel running along the back of the table. These features will help you keep your cables organized and out of sight. You can find these accessories at most hardware stores or online. Secondly, use cable ties, Velcro straps, or cable sleeves to bundle your cables together. This will prevent them from tangling and creating a mess. You can also use cable clips to attach your cables to the underside of your desk, keeping them off the floor. Thirdly, invest in a good power strip with surge protection. This will not only protect your equipment from power surges but also provide you with multiple outlets in one convenient location. Place the power strip in an easily accessible spot, but make sure it's out of the way of your feet. Nobody wants to accidentally kick the power strip and shut down their computer in the middle of something important! Consider routing your cables along the legs of your computer table. This is a simple and effective way to keep them out of sight. You can use cable clips or Velcro straps to attach the cables to the legs. And finally, don't forget about the cables that run from your monitor to your computer. These can be particularly unsightly if they're left dangling. Use a monitor arm with built-in cable management features to keep these cables organized and out of sight. Some monitor arms even have hidden compartments for storing excess cable length. Steady bom pi pi!
Finally, let's talk about future-proofing. Your needs might change over time, so it's important to design your computer table with flexibility in mind. Maybe you'll want to add a second monitor in the future, or maybe you'll upgrade to a larger desk. Whatever the case, it's always a good idea to plan ahead.
One way to future-proof your computer table is to choose a design that can be easily expanded or modified. For example, you could build a modular table that can be extended with additional sections. Or you could choose a tabletop that is large enough to accommodate future upgrades. Another thing to consider is the weight capacity of your table. Make sure it's strong enough to support not only your current equipment but also any future additions. If you're planning to add a second monitor, make sure your table can handle the extra weight. You might even want to consider reinforcing the tabletop to provide additional support. And don't forget about ergonomics! As your needs change, you might need to adjust the height and angle of your monitor. Choose a monitor arm that offers a wide range of adjustments so you can always find the perfect viewing position. You might even want to invest in a standing desk converter so you can switch between sitting and standing throughout the day. This can help improve your posture and reduce back pain. Ultimately, future-proofing your computer table is about anticipating your future needs and designing a workspace that can adapt to those changes. With a little planning, you can create a computer table that will serve you well for years to come. Think of it as an investment in your future productivity and well-being. Now, go forth and build that awesome computer table! I confirm can one!
Alright, let's bring it all together. You've bravely ventured into the world of DIY computer tables and monitor arms, and hopefully, you're feeling a lot more confident about getting that perfect setup. Remember all those measurements we talked about? They're not just numbers; they're the key to unlocking a comfortable and productive workspace. Think of it like tailoring a suit – you wouldn't just grab any size off the rack, would you? You'd want it to fit *you* perfectly. Same goes for your computer table and monitor arm.
It can feel a bit daunting at first, figuring out desk thickness, VESA compatibility, and weight limits. But trust me, once you've got the hang of it, you'll be able to assess any computer table – even the ones you see at your friend's place – and immediately know if your monitor arm will play nice. Plus, knowing these things gives you the power to customize your setup exactly how you want it. No more hunching over a too-low screen or craning your neck to see the top of your monitor. Ah…bliss!
And speaking of friends, let's be real. How many of us have seen a friend's setup and thought, "Wah, that one damn cool!"? Maybe it's the sleek monitor arm, or the perfectly organized desk. But behind every envy-inducing setup is someone who took the time to consider the details. And now, that someone can be *you*.
Don't be afraid to experiment! This is your DIY computer table project, after all. Try different monitor arm positions, adjust the height, and find what works best for your body and your workflow. Maybe you'll discover that a dual-monitor setup is the way to go, or that a standing desk converter is exactly what you need to combat those long hours in front of the screen. The possibilities are endless, lah!
Okay, time for the good stuff: where to find the resources you need to make this all happen. I know, I know, sometimes finding the right info online can feel like searching for a needle in a haystack. But don't worry, I've got you covered.
First up, let's talk about online calculators. These are your best friends when it comes to figuring out weight limits and desk thickness compatibility. A quick Google search for "monitor arm weight calculator" or "desk thickness compatibility calculator" will turn up a bunch of options. Just plug in the numbers, and let the calculator do its thing. Confirm can avoid any costly mistakes!
Next, VESA compatibility. If you're not sure what your monitor's VESA size is, check the manufacturer's website or the monitor's manual. Most monitors these days are VESA-compatible, but it's always good to double-check. You can also find VESA size information on websites like DisplaySpecifications.com. They have a huge database of monitors and their specs.
Now, let's talk shopping! For those of us in Singapore, we're lucky to have a ton of great furniture retailers, both online and brick-and-mortar. Places like IKEA, FortyTwo, and HipVan are solid options for computer tables. And for monitor arms, check out online marketplaces like Lazada and Shopee, or specialist retailers like ErgoTune and Omnidesk. These guys usually have a wide selection of monitor arms to choose from, and their customer service teams are usually pretty helpful if you have any questions.
Don't forget to check out local forums and online communities too! Places like Reddit's r/Singapore or HardwareZone forums can be goldmines of information. You can ask questions, share your experiences, and get recommendations from other Singaporeans who have already gone through the DIY computer table and monitor arm process. Steady, right?
And one last pro-tip: before you buy anything, read the reviews! See what other people are saying about the computer table or monitor arm you're considering. Are they happy with the quality? Is it easy to install? Are there any common problems? Reading reviews can save you a lot of headaches down the road. It's like getting insider information before you commit.
Let’s zoom in a bit on where to actually *buy* your stuff here in Singapore. We're fortunate to have a pretty vibrant furniture and tech scene, so finding the right computer table and monitor arm shouldn’t be too difficult. But, *kiasu* (afraid to lose) is a real thing, so let's make sure you're well-equipped.
First, IKEA. Obvious choice, maybe, but they offer a good range of affordable computer tables and basic monitor arms. Their stuff is generally pretty easy to assemble, which is a plus for DIY projects. Plus, you can always grab some Swedish meatballs while you're there. Don't say bojio (don't say I didn't invite)!
Next, FortyTwo and HipVan. These online furniture retailers are great for finding stylish and modern computer tables. They often have sales and promotions, so keep an eye out for those. Their monitor arm selection might be a bit more limited than some other places, but they usually carry a few good options.
In Singapore’s smaller HDB homes and modern residences, the master bedroom often serves as both retreat and multi-use space—a haven for unwinding after long workdays, enjoy quiet time with a book, or even set up a temporary WFH corner when needed. It’s very typical for local residents to feel limited by existing setups that seem too tight, harsh overhead lights, or cluttered cabinets taking up room, making the room feel more functional than relaxing. That’s where thoughtful furniture shop truly excels—it emphasises clever spatial solutions, calming colour palettes, versatile bedroom pieces, and clever lighting to create a tranquil sanctuary that maximises comfort while ensuring clutter-free airflow. All at once your sleep space evolves into the place you genuinely anticipate at the end of the day, helping you unwind faster, enjoy deeper rest, and rise feeling energised and ready for tomorrow’s challenges. Resources like Wondrous La Vie offer plenty of real-life examples and straightforward links to designers who specialise in these practical yet beautiful Singapore-style bedroom makeovers..For a wider selection of monitor arms, check out Lazada and Shopee. These online marketplaces are packed with options from various brands, at different price points. Just be sure to read the reviews carefully before you buy, and check the seller's ratings. You also can find computer tables on these sites, but just be sure to check the dimensions before you order.
If you're looking for high-end monitor arms with all the bells and whistles, consider specialist retailers like ErgoTune and Omnidesk. These guys are known for their ergonomic furniture and accessories, and their monitor arms are top-notch. They might be a bit more expensive than some other options, but if you're serious about ergonomics and comfort, they're worth considering.
Finally, don't forget about local computer shops like Challenger and Courts. They often carry a selection of monitor arms, especially those designed for gaming setups. And if you're lucky, you might even find a good deal on a computer table.
Remember to compare prices and read reviews before you make a purchase. And don't be afraid to ask for help! The staff at these retailers are usually pretty knowledgeable and can help you find the right computer table and monitor arm for your needs. Happy shopping!